If you’re taking a trip while exclusively pumping, you’re going to be traveling with breast milk! Below I’ve laid out everything you need to think about when traveling with breast milk, whether you’re driving or flying to your destination, and whether you’re traveling with frozen breast milk or fresh.

This post may contain affiliate links, which means if you click a link and purchase something, I may make a small commission at no additional cost to you. I only recommend products I love! More information here.
Traveling with breast milk by car
If you’re exclusively pumping, most of what you feed your baby will be the milk you pump on the trip, but it’s not a bad idea to bring a little extra milk as well, in case of a spill or other mishap. Here’s how to pack breast milk for a road trip.
How to pack and transport fresh breast milk
If you just want to bring a few extra bottles, you can pack it in a small breast milk cooler for travel.
Breast Milk Coolers


Most breast milk coolers come with an ice pack. Make sure the ice pack is frozen solid when you leave, and make your milk the last thing you pack and the first thing you unpack.
If you need to bring a larger amount of milk, you can pack the breast milk in a larger cooler for the trip with ice or ice packs. If you’d like, you can monitor the temperature of your cooler using a thermometer like this one (it tells you whether the cooler is in the “refrigerator zone” or the “freezer zone”).
Fresh breast milk can be stored in a cooler up to 24 hours – more info here on that here.
How to travel with frozen breast milk
If you are traveling with frozen breast milk, you will also want to pack it in a cooler. Depending on the length of the trip, you may or may not want to use dry ice.
Without dry ice
A few tips for packing your frozen milk in a cooler without dry ice:
- Make sure the cooler is as full as possible. If you don’t have enough milk to fill the cooler and don’t want to use a ton of ice, consider freezing water in plastic zip-top bags and using that to ensure it’s full.
- Keep the freezer closed and refrain from opening it until you get to your destination. Opening it will increase the temperature.
- Consider pre-chilling the cooler in the freezer. (Obviously, this won’t be possible if it’s a big cooler – this is just an option for smaller, soft coolers.)
With dry ice
As mentioned above, dry ice is an option for longer trips – here is an overview of how to pack a cooler with dry ice for trips.

Above is what this might look like – Iyana from our Facebook Group packed 4,000 ounces of milk in 150 quart coolers in dry ice for a 14 hour drive; it arrived frozen solid.
Hopefully, you won’t have any issues with your frozen milk thawing en route. However, if does fully thaw (meaning no ice crystals are present), it will need to be used with 24 hours or discarded.
Frozen milk that still has ice crystals is not considered “thawed.”

Traveling with breast milk by plane
Here’s what to consider when you’re flying with your milk.
Packing fresh breast milk to carry on
The best way to pack breast milk for carry on is in a breast milk cooler. If you have a lot of breast milk, some coolers will hold up to six 8 oz bottles; and if you fill these bottles to the top, you can fit about 60 oz of milk.
For passengers flying in the U.S., while there is no defined limit to how much breast milk you can carry on, the TSA website references a “reasonable amount.”
If you’re traveling with a great deal of breast milk and are nervous about going through security, you could consider utilizing TSA Cares.
During the screening process, be sure to take your milk out when you take out your other liquids, laptop, etc., and make sure you tell the screener that you’re traveling with breast milk and that you have a pump. They will likely examine the milk by x-ray.
If you need ice to keep your milk cool (if it’s a long flight or you experience delays), you may be able to get ice from the flight attendant or a restaurant inside the terminal.
Checking frozen milk
Checking your frozen milk is another option if you have a lot of frozen milk.
Again, follow the same guidelines I mentioned above for packing frozen breast milk: pack the cooler full; don’t open it until you get home and are able to put it away (resist the urge to check on it!); and pre-chill the cooler itself it if possible.
Becca from our Facebook group checked 276oz of breast milk and checked it in a Yeti cooler on a flight from Israel to the United States. It arrived frozen solid.

Shipping frozen milk ahead to your destination
This is a great tutorial on how to ship breast milk with dry ice.
If you don’t want to deal with packing it yourself, Milk Stork may be able to ship it for you.
Feeding your baby on the trip
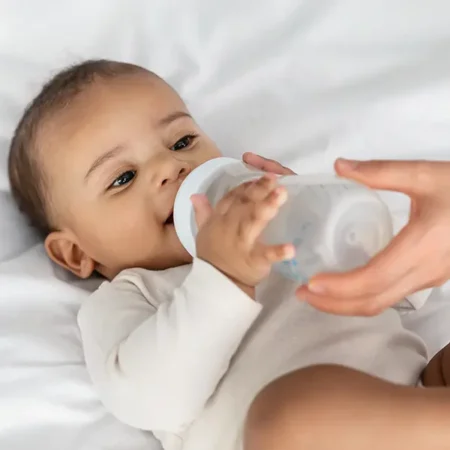
In most cases, it will be easiest to keep your most recently pumped breast milk out at room temperature, and then feed that to your baby.
Fresh milk can safely be kept out at room temperature for about 4 hours; this way, you don’t need to worry about warming breast milk for baby while traveling.
If you do want to use milk from your cooler and your baby prefers warm milk, you have a few options for warming it:
- You can ask the flight attendant (or if you’re in the terminal, in a restaurant) for hot water in a cup and put the bottle in it for a few minutes to warm. Just make sure that when you go to put the bottle in, there’s enough room so the water doesn’t overflow onto your hand.
- You can use a portable bottle warmer.
- Bring a thermos of hot water with you and warm your bottle in that.
Portable Bottle Warmers


More on warming bottles on the go here.
Pumping on the trip
A few things to think about when it comes to pumping on your trip:
If your pump doesn’t have a rechargeable battery, you will need either a car adapter or battery pack for your pump. Make sure you get one that has the correct voltage for your pump – more on breast pump battery packs here.
Breast Pump Battery Packs


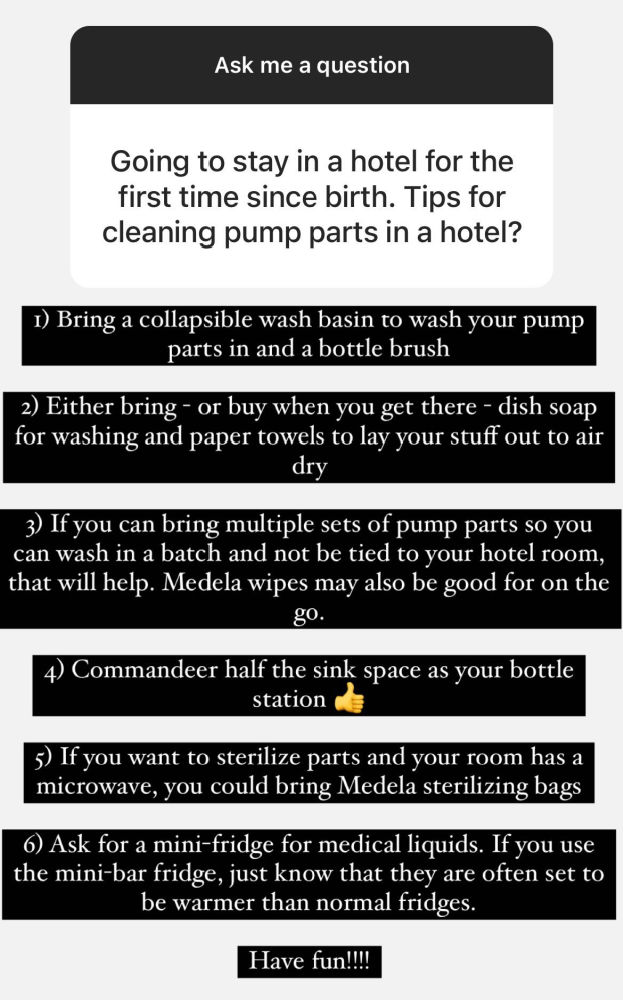
If you’ll need to pump more than once, you’ll need to think about cleaning your pump parts. You have a few options:
- You can pack enough sets of clean pump parts and bottles to get you through your trip/one day of travel. Pack each set – flanges, valves, connectors, bottles, and caps – in a gallon-sized zip-top bag so you can just pull it out when you’re ready to pump.
- Washing pump parts safely on the road is difficult, because public restrooms are usually the only option. If you do have access to a clean space, you could consider washing them en route. Make sure to bring a collapsible wash basin, dish soap, bottle brush, and clean towels to put your pump parts on after you wash them.
- If neither of these will work, you can consider using Medela Quick-Clean wipes.
If you are flying with your baby, here is a primer that I wrote up on the logistics of how to manage this.

Planning to travel? Make your trip so much easier – grab the Pumping Travel Planner for $9!
Managing your milk at your destination
Pumping at a location where you don’t normally pump, without the comforts of your pumping station and setup for storing milk and washing pump parts is one of the more stressful things about figuring out how to travel with breast milk.
Here is what you need to think about, whether you’re staying at a hotel or in a home.
Storing your milk
Before you leave, you’ll want to ensure that there is a fridge that you can use at your destination.
Storing milk in a hotel
If you’re staying in a hotel, call and ask ahead of time if a mini-fridge can be provided for your room. Tell them that you need it to store breast milk – it may be provided at no charge as breast milk is sometimes considered a “medical liquid.”
If you end up using the minibar fridge in the hotel, you may want to check the temperature of the fridge, as they are often kept warmer than normal.
If you need a freezer, you could call ahead and ask if there is a hotel freezer you would be able to use during your stay. Make sure to seal your breast milk into a single container and label it.
Storing milk as a guest
If you’re staying as a guest in someone’s home, it might be a good idea to ask ahead of time to make sure there’s some space in their fridge or freezer that you can use.
Dealing with washing everything
In addition to fridge space, you’ll also need room to wash your pumping gear and bottles.
Ideally, there would be a kitchen counter and sink where you could do that, but in a hotel the bathroom will work. You’ll want to have a collapsible wash basin, dish soap, bottle brush and clean towels to put your pump parts on to dry.
Packing for the trip home
Finally, for the trip home, if you’re using an ice pack for the trip, you will want to be able to freeze it solid before you leave, both to keep your milk cold and to avoid extra inspection from the TSA if you’re flying.
Alternatively, you could ask for ice at a restaurant (obviously, after you go through security if you’re flying).
Planning to travel? Make your trip so much easier – grab the Pumping Travel Planner for $9!
What other tricks do you use when you travel with breast milk? Feel free to add ideas below in the comments.
References
- Kellymom. “Human Milk Storage.” https://kellymom.com/store/freehandouts/milkstorage01.pdf
- Transportation Security Administration. “Traveling with Children.” https://www.tsa.gov/travel/special-procedures/traveling-children#quickset-traveling_with_children_1
- Only the Breast. “How to Ship Breast Milk.” https://www.onlythebreast.com/buy-sell-donate-breast-milk/bags-and-bottles/


Comments & Chitchat
Hello, so I will be flying with my little one on a 5 hour flight. I plan to bring cold breastmilk with me in a cooler. You said that milk can be in a cooler for 24 hours. When we get to our destination and I put the milk in the fridge does the milk still need to be used within 24 hours or does the shelf life increase back to 3-4 days since I put it in the fridge?
It’s 3-4 days as long as the milk in the cooler stays cool the whole time. Personally, I’d probably use it first “in line” when we get there.
I’m almost 6 weeks pp, and I just took a 4-day trip with my family! Now, we live in and traveled in Japan, so some things might be different here than in the West.
I used the Kiinde bags and adapter to pump with my main pump (Spectra S1) while in the hotel and overnight. I also used the fridge hack a few times, since our room had a mini fridge. I only brought a few bottles, since I wasn’t actually pumping into them. While we were out, I just used my manual pump for like 10 minutes on each side, which is usually enough to drain me. Luckily, the pods like the Mamaro pods are fairly easy to find in Japan, so I utilized those. We were going to kid-oriented things anyway for my 4-year-old, so I would pump and change baby in those pods. We took a bullet train to our destination and back, and it was about a 3 1/2 hour ride. I pumped at the beginning and at the end of the train ride using my manual pump and a scarf to cover up.
The only things are that I didn’t have the chance to wash the bottles and pump parts like I normally do, and I didn’t quite get my 120 minutes in, but I figured that I could make up for it in the couple of days after we got home. We also supplement with formula, so we brought some “formula cubes” with us that are available in Japan.
It took some pre-planning, but it’s definitely doable, and it wasn’t as hard as I thought it would be!
Thank you so much Rebecca! So helpful!
Do you have a recommendation for a cooler bag that is good for bags of milks instead of bottles? Planning on traveling without my son and want to make sure I can keep the milk cold/frozen on the way home
Hi! I’m traveling for work for about 2.5 days without baby. I plan to pump and refrigerate. My room has a fridge but the hotel does not have a freezer available (I called). I can use a cooler for milk on my trip on the way there (about 2 hr flight and 3 hr drive to destination) but how do you recommend taking it back? The ice pack won’t be frozen solid anymore from the fridge alone while I’m gone. Should I use ice? I think tsa will make me dump that right? Any advice for getting the milk back safely is appreciated!
Hi Elizabeth! I would try the cold but not frozen ice pack and also add ice on the way there. TSA will probably make you dump the ice to go through security, but you can get more past security and/or from the flight attendant on the flight. I think that should work – there are a lot of variables but I think that’s what I would do. Good luck!
Hi! Thanks for all your tips! I’ll be traveling for 4 days without baby in a few weeks. I pump 4x a day usually around 5 oz each time, so that’s about 80ish oz that I’d like to fly back with me. Can I plan to use bags to store instead of bottles? Bags will take up less room than bottles in a cooler. And should I plan to freeze the bags or travel with them unfrozen? Thank you!
Hi Lauren! Bags are fine! If you’re checking the milk I’d freeze, otherwise probably keep it fresh. Good luck!
Hi I will be travelling without my LO for 3 days and plan to pump and store my milk to bring back. The hotel I am staying at will have a fridge in the room and can also store my milk in their freezer. I will be bringing a cooler with many DIY ice packs and plan to check the cooler in, however the cooler will be kept at room temperature for 10-12 hours. Would you recommend freezing the milk or keeping it fresh? (I am in Canada so milk delivery systems are too expensive). Thank you in advance!
Hi Kristine! If you have enough room to keep it fresh in the coolers, and you’re driving, I would do that. Then freeze anything you won’t feed within the 4 day window when you get home. If you’re flying, taking that much fresh might be hard (though I am not familiar with the rules in Canada, only in the US).
My thinking is that frozen is more fragile than fresh so I would try to keep it fresh since you’ll be gone less than four days – but honestly, either way is fine. I would just do what is easiest for you. Hope that helps!
Hi! I will be moving to another state and the drive is about 5 hours. How can i transport my deep freezer full of breastmilk?
Hi Lexi! Here you go:
https://exclusivepumping.com/moving-breast-milk-stash/
Hi everyone,
I think I might be able to provide you all with some good Intel and a solution to storing breastmilk on car road trips, for any distance. My wife has the same concerns as you all spoilage and transport. Just started a 9 day TX road trip. I brought a cooler with ice with 5.5 days worth of milk… Using a cooler because I haven’t tried my solution out prior (suspense is building). The last min I bought the following off Amazon, and came day of the trip, thank goodness, and I am testing out this min with 28oz…. Well what is it, is a electric car cooler/freezer. So far yes it’s keeping the milk frozen and it also froze a 12 oz bottle of water. It plugs into your car cigarette lighter, and also has a cord to go into electricity when not in car. It doesn’t produce and harmful gas when on in car while driving like dry ice. So far I’m convinced and will start moving more stuff into it. Brand is Bougerv 23 qt refrigerator. It’s not too big, there is also a 30 qt. Of Amazon it cost about $250. It will hold and keep frozen ( keep it plugged in car or electricity) your milk. I hope this helps you all. I will report back at end of our trip with final thought.
Daniel
Hello all,
Just a follow-up. The portable car freezer worked perfectly. The only thing I had to sort out was if we were visiting a museum I brought the freezer inside with me and asked them if I could plug it in behind their desk. I did this at two museums and also at the NASA museum… That’s the one took a little bit longer but when I got close to the door I’ll let them know that had to plug it in right away because it was breast milk and they let me bypass the line 🙂
Also during the road trip and we stopped to eat at some fast food places, I would just leave the car on with it plugged in lock the car and take the key with me with the car still on. This portable freezer is excellent and I definitely recommend it for any road trips.
Daniel
I will be traveling by car for about 6 hours with frozen breastmilk. I will be bringing 8 days worth of milk with me. I am reading that it is not safe to travel with dry ice in your car if the ride will be more than 15 minutes. Will milk really stay frozen with just ice for this length of a car ride?
I think it probably will if you don’t open the cooler and have it packed full. People have done 16 hour flights and it was okay. Also – as long as the milk is still (at least) slushly when you get there, it’s fine to refreeze. I think it will be okay. Good luck!
Do you know what size yeti bag she used to transport the 276oz? I will be gone for two weeks for work so will need to bring back about 450oz on a 4 hour flight. Trying to determine what size bag I’ll need. The milk will be frozen in breastmilk bags. Thanks!
I don’t know but you could maybe ask her on instagram? Sorry I’m not more helpful! ❤️
Hey Cara – Curious to hear what you ended up doing? I’m in a similar boat as you but will be gone for a week with a three-hour flight home. Any guidance would be appreciated! Thanks! -Tara
More of a question than a comment. I work outdoors in the summer. In the woods and on the river in up to 32•C heat. Do we think the Ceres chill will work in that setting?
Additionally.. I read you shouldn’t mix fresh and chilled milk, so can you not add a fresh pump to the container? It holds quite a bit oz wise so I’d assume it must be from multiple pumps.
Hi Ash! I think it would work but I agree that adding a fresh pump isn’t ideal and I’m not sure whether it’s a good idea.
Hello im working as a nurse and have 24 hours duty. I’m pumping my milk and keep it in the freezer, then bring it home after my shift using my insulator bag.. im traveling for around 4-5 hours. Can i put back my slightly defrost milk in the freezer or just in the fridge? And how long can i still use it? Thanks
Hi Kristel, as long as it has ice crystals, you can put it back in the freezer. If it’s still frozen, normal guidelines for frozen milk would apply. Otherwise, you have 24 hours. You might be better off just keeping it in the insulator bag with an ice pack and putting it in the fridge as soon as you get home?
The lady who traveled between the Us and Israel with a checked yeti cooler of breast milk… did she use dry ice? Or was it just packed in? I have a long flight coming up and want to be able to take my milk stash with me!
She didn’t use dry ice, it was just all packed in!
Did she limit bags to a number of ounces? Like did it need to be under 3 or 3.4? Or did she fill them to any ounce?
Thanks for the info! Do you have any tips for exclusive pumper when going on a cruise and baby is not going with you?
I’ve never done that! Excellent question. I would find out if its possible to get a fridge of some kind in your room – I would tell them it’s for a medical liquid (which it is). If you’ll be on the cruise for more than a few days you might have to dump some milk unless you can get access to a freezer. For traveling home you may be able to bring a cooler and fill it with ice on the trip. Good luck!
How big of a cooler with frozen breast milk and baby food can you bring on the plane?
I would call your airline and ask, and see if you can get it in writing. Then print it out and bring it with you. The TSA just says “reasonable amounts” – they don’t give you an actual amount.
A great option is Milk Stork (milkstork.com). They can help you transport milk safely, ship milk home for you, and even transport frozen milk stashes! It’s run by a mom of 3 who understands our needs! Check them out!
I will be away from my 7 month old for the next month due to family emergency back home.
Should I store breast milk in fridge or freezer? And how to travel back with it? My trip is 19 hours to go back.
Thanks a lot
Hi Martina! I think you’ll want to freeze it because Of the length of time you’ll be gone. I would get a cooler. Ask your airline if you can check a cooler with dry ice. Good luck!
Hello! This article has helped ease my travel anxiety. I will be gone from my LO for 4 days. Do you recommend freezing breast milk and transporting back frozen? How long does fresh milk stay good in fridge? Thank you.
Hi Leah! Breastmilk will be okay for 3-8 days in the fridge, with less than 3 being ideal. I think you could do it either way. Will you have access to a freezer?
I have a different situation. I’m hoping to be done exclusively pumping very soon. Baby is almost 7 months old and I have quite the freezer stash. I think I’ll have enough to make it to a year within the next month. Problem is, we are planning a vacation (by plane) in April or May. Any tips on how to successfully navigate this with frozen breast milk? I’m wondering if I shouldn’t just switch him for the week but then I’d feel guilty and probably just continue to pump until after our vacation.
thank you!
Hi Amber! It can be done, but may be a challenge. Are you staying with family or in a hotel? If with family, it may be easiest to ship it rather than travel with it. A hotel might be tricky because you obviously need access to a freezer.
Hi, uhm.
I need to bring my baby in the party, that will last about 10 bec. 1 in the morning and 1 in the afternoon.
Is it okay to put the breast milk On the cooler?? And bring 1-3 bags?
will it still be good for 24 hrs? Or only 2 hours still for 3 bags? Thanks
Hi Ahya, maybe bring a plastic ziplock bag, put the breastmilk in it, and put it in the cooler? If the cooler is less than 59 degrees F, it should be good for 24 hours. Hope that helps!
Hi! Do you have any experiences in traveling Internationally with breastmilk? I will be traveling to Germany in a few weeks for 5 days for work. I’m not concerned about the travel from US to Germany as the TSA guidelines are pretty clear. The confusion is with the EU equivalent- transporting all the milk back to the US. I will have access to a fridge but not sure on the freezer. Will liquid be allowed on that international flight? I don’t want to invest in a bunch of special supplies… Thanks!
hi. can i put my brestmilk in a small cooler jug with actual ice cubes? how long will it take?
Hi Marian! Do you mean putting ice in the breastmilk? I would not do that. Putting ice around a breastmilk bottle is fine. Hope that helps!
I will be out of town for 3.5 days and my son will not be with me- is it best to keep the pumped milk in a fridge & transport back home in sealed bags in my cooler OR should I freeze it? (Will be flying and our flight is about 4.5 hours- so I am thinking 7 hours total in cooler bag with ice packs)
I would keep it fresh. Make sure to label it, and then I would feed the oldest when you get home and maybe freeze the rest (or evaluate how long you can keep it in the fridge.)
In the TSA regulations it states that you do not have to be traveling with your child to carry on breastmilk.
From the TSA website:
“3-1-1 Liquids Rule Exemption
Formula, breast milk, juice in quantities greater than 3.4 ounces or 100 milliliters are allowed in carry-on baggage and do not need to fit within a quart-sized bag. Remove these items from your carry-on bag to be screened separately from the rest of your belongings. You do not need to travel with your child to bring breast milk.
Ice packs, freezer packs, frozen gel packs and other accessories required to cool formula, breast milk and juice are allowed in carry-on. If these accessories are partially frozen or slushy, they are subject to the same screening as described above. You may also bring gel or liquid-filled teethers, canned, jarred and processed baby food in carry-on baggage. These items may be subject to additional screening.”
Thank you so much! My husband planned a week-long road trip and I had a lot of anxiety about how I was going to handle pumping until I read this. One question: is it better to use actual ice cubes in a cooler or do ice packs do the job just as well?
Ice packs will work too!
Hi! If Input refrigerated breast milk in a small cooler with ice packs and put it in a refrigerator when we arrive at our destination (about 6 hours later), will it still be good for a few days? Or only 24 hours still? Thanks!
Hi! If it stays as cool as it would be in a fridge (which seems reasonable for 6 hours), I think it still will be fine for a few days in the refrigerator. You could get a thermometer and check the temp when you leave and when you get there, and if it hasn’t changed, you should be good to go. 🙂
Hi!
Do you know how I could transport 800 oz of frozen milk in a deep freezer from Californian to Georgia ?
Moving truck will be taking our things, but we will be flying? Not sure how to do this! Could you please email me! Much appreciated!
Hi Meena! So I think that if you’re flying there, your two options are to ship it or try to check it. Both are going to be pricey. Maybe look into Milk Stork for shipping? If you want to check it, I would get a bunch of the coolers I linked to in this post and pack as much milk as you can, and pay $25 to check each bag. Maybe ship some, check some, and donate the rest? Sorry you have to deal with this!
Ship it with milk stork
Thank you so much for this amazing article! Returning to work and all of the travel needed for my job has been pretty rough on my breastfeeding goals but I am determined. It has been great to get the tips in your article and the advice of the other moms. I love this site!
I was really surprised at the limited options available for moms without a mini fridge under their desks at work or tons of extra space in their carry-on. So I decided to do something about it! Ceres Chill (www.cereschill.com) is a waste-saving breastmilk thermos system. I would greatly appreciate thoughts and feedback from you and your readers.
Ceres Chill Kickstarter April 2, 2019!!
You can also request a microwave in advance at a hotel and bring a microwave sterilizer bag with you to sterilize your parts. I like the Medela bags. Additionally there are now breast milk shipping companies like MilkStork that make traveling with and shipping breast milk very easy.
Great points!
Also make sure if the hotel is giving you a mini fridge with a freezer that isn’t normally part of the room that you ask them to put it in the room ahead of time. Otherwise if it doesn’t get turned on until you get to the room the freezer part won’t be cold at all!
You can ask the TSA to skip x-ray on the breast milk but be prepared that most will require you to get a pat down and if the milk doesn’t pass their laser scan for some reason they’ll make you open the top and they’ll hold a little paper above it that they’ll need to scan instead. They are never allowed to actually touch the breast milk itself though.
When traveling internationally though all bets are off and it’s generally going to be the option of x-ray it or dump it.