Not sure how to use the Medela Freestyle? Here’s everything you need to know about how to assemble and clean it, how the breast pump works, and extra tips and tricks for making using it as easy as possible!
This post may contain affiliate links, which means if you click a link and purchase something, I may make a small commission at no additional cost to you. I only recommend products I love! More information here.
(Note: This post discusses the original Medela Freestyle. More on the newer Freestyle Flex here.)
I love my Freestyle – it’s a great pump, super easy to use, and really handy for on-the-go pumping. I exclusively pumped with it when I had my son, and continued to use it at home with my other two babies (while using a Medela Pump in Style at work). It lasted me through 44 (non-consecutive) months of pumping!
(If you don’t have your Freestyle yet, you may be able to get it free or discounted through insurance super easily here, or you can get it from amazon.)
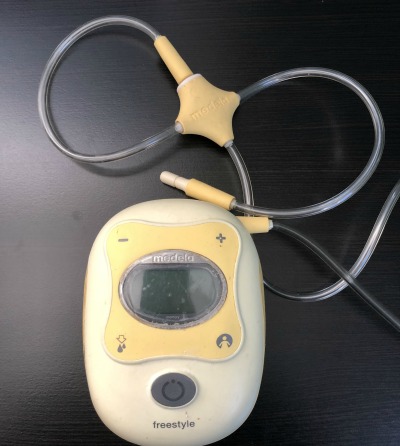
Putting together your Medela Freestyle pump parts
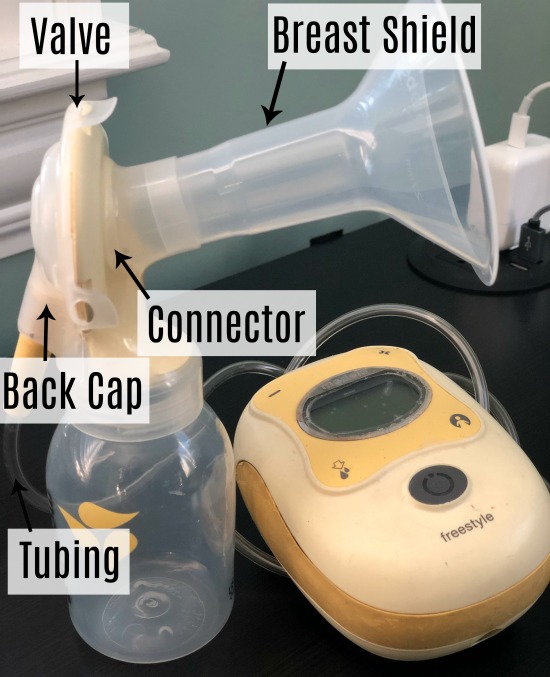
The Medela Freestyle breast pump parts consist of:
- Breast Shields – Breast shields are also called flanges (or “cones” or “horns”) and they are what you put on your breasts. The 24mm and 27mm sizes come standard with the Freestyle, but you might need a different size depending on the size of your nipple (not the size of your breasts).
- Valve – The valve is the workhorse pump part – it stretches and releases each time the pump motor pulls at the valve, creating the suction that pulls the milk from your breasts.
- Connector – The connector joins the tubing, breast shield, and valve together.
- Back Cap – This piece secures the valve in place.
- Tubing – The tubing connects the pump to your breast pump parts.
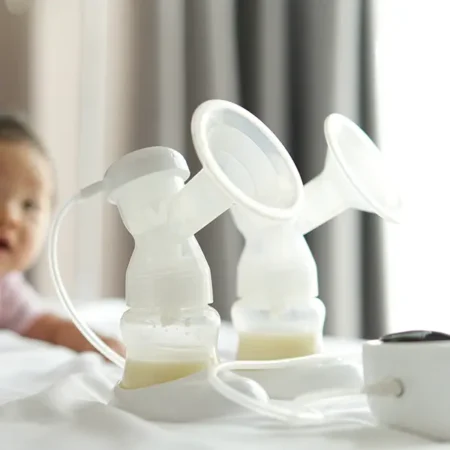
- Bottle – Obviously, this is where your breast milk goes when you pump.
To put your breast pump parts together, put the valve in place on the back of the connector, and snap the back cap on top of it.
Then, attach your breast shields and tubing to the connector as shown in the photo above. Screw in the bottle at the bottom of the connector, and you’re good to go!
How do you use the Medela Freestyle?
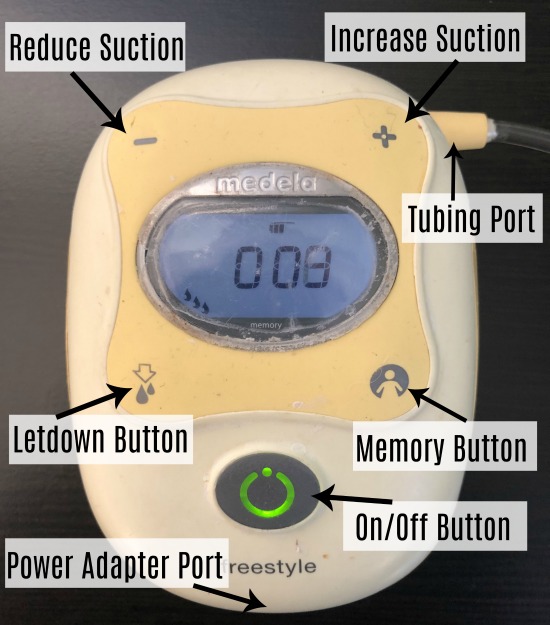
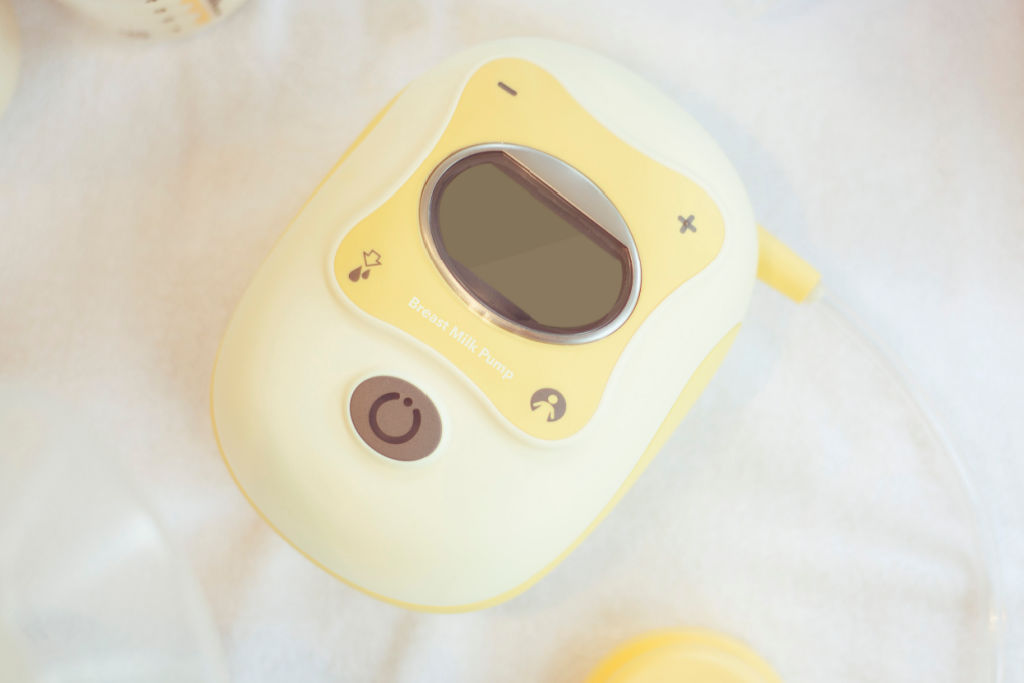
Here are the different buttons on the Medela Freestyle pump, and what each of them does:
- On/Off Button – Pretty straightforward. When you turn it on, it starts up in letdown mode.
- Letdown Button – Allows you to toggle between letdown mode and expression mode. Letdown mode is faster and lighter, and expression mode is slower, with deeper suction. As noted above, the Freestyle starts in letdown mode, and it automatically switches to expression mode after two minutes. If you need more than two minutes to get a letdown or want to switch to expression mode sooner, you can use this button to make the change.
- (-) Reduce Suction – The Medela Freestyle has 9 suction levels. Pushing the – button reduces the suction level.
- (+) Increase Suction – Pushing the + button increases the suction level.
- Memory Function – If you press and hold this button for three seconds when you’re in the expression phase, it will save your pumping pattern. To use the saved pattern, press it once after turning on the pump. (I never used this once in my 44 months of pumping and wouldn’t worry about this button.)
- Tubing Port – The single-sided end of the tubing should be plugged into the tubing port.
- Power Adapter Port – This is where you plug your pump in to charge.
- Backplate/Belt Clip – You can slide the backplate off of the back of the pump to insert and take out the battery as needed. I found the belt clip to be largely useless, but it’s there if you want to try it.
Here’s how to read the display screen:
- Timer – When you start the pump, a timer starts running. I found this so helpful in keeping me honest and making sure I pumped for the full time that I intended.
- Speed Level Indicator – When you change the suction level on the pump, the timer will be replaced for a moment by the speed level indicator.
- Letdown Speed Indicator/Expression Speed Indicator – These are visual indications of the suction level of the pump. Letdown speed displays on the left, and expression speed is on the right.
- Power Indicator – If this little power symbol is present, it means that the pump is plugged in.
- Battery Indicator – This shows you how much battery power the pump currently has. Three bars is fully charged, one bar and blinking means it’s time to find an outlet. When it’s charging, the bars light up.
To pump with the Medela Freestyle:
- Put together your pump parts
- If your pump isn’t charged or is low on power, plug it in
- Attach the tubing to your pump and pump parts
- Place the breast shields on your breasts
- Turn the pump on
- After the pump switches to expression mode, push the Increase Suction button to the highest suction that is comfortable for you. (Keep going until you feel a bit of discomfort, and then push Reduce Suction once.)
How long should you pump? This depends on a few variables. Are you nursing and pumping to build up a freezer stash? Or are you exclusively pumping? How old is your baby?
If your baby is a newborn and you have no idea how long you should pump, aim for 15 minutes. Otherwise, you can refer to the pumping schedules I used when I was exclusively pumping for an idea of how long and how often to pump.
Cleaning and maintaining your Medela Freestyle
Here’s how to take care of your pump.
Charging your breast pump
When you first get your pump, slide the backplate off of the back of your Freestyle and insert the battery so that the gold contacts on the battery touch the gold contacts on the pump. The silver tab should stay on the battery and should point upward when inserted.
Charge your pump for 24 hours continuously when you first put the battery in. You can use it during these 24 hours, just keep it plugged in and charging.
When the pump is fully charged, it should last for about three hours of pump time. (That’s what Medela says, and it matches my personal experience.)
Washing your pump parts
Before using your pump, you should sterilize your pump parts. You can use a sterilizer, a Medela steam bag, or put in them in a pot, cover with water, and boil for 5 minutes.
To wash your breast pump parts, take them apart and clean them in warm soapy water in a wash basin using a clean bottle brush.
Tubing should be washed if there is residue or condensation present. Wash tubing in warm soapy water, rinse it, and hang to air dry. Do not use the pump with wet tubing, as it can damage the motor.
Wipe off the faceplate of your pump as needed.
How often do you need to replace Medela Freestyle pump parts?
Pump parts stop working as well over time – residue builds up and they get microscopic tears. You should replace pump parts at the following intervals:
- Flanges – Every 6 months.
- Connector, Valve, and Back Cap – Every 3 months.
- Tubing – Tubing should be replaced if it won’t reliably stay connected when you’re not moving around excessively.
What if your Freestyle stops working?
First, troubleshoot a little bit:
- Take all of the pump parts apart and put them back together. Make sure that the back cap is snapped into place securely.
- If your breast pump parts are wet, try a dry set.
- Make sure your tubing is attached securely in all three places – to the pump, and to both bottles.
- If it won’t turn on, try plugging it in even if it should be fully charged.
If none of this works, call Medela customer service for more advanced troubleshooting.
Extra tips for using the Medela Freestyle
Here are some additional tips for making using the Freestyle easier!
Use a hands-free pumping bra
It took me forever to find out about hands-free pumping bras, so I’m here to make sure you don’t make the same mistake!
Holding breast shields up to your breasts the entire time you pump is boring and exhausting. Instead, you can get a hands-free pumping bra that holds them up for you.
Hands-Free Pumping Bras

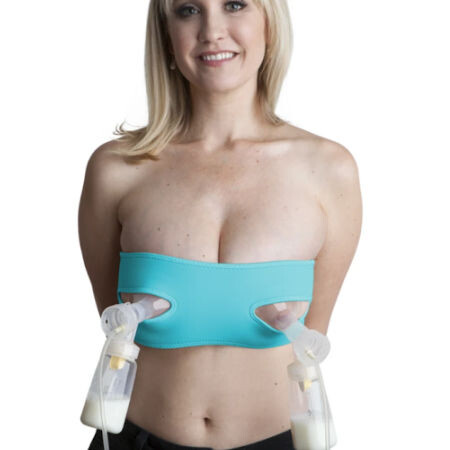

There are a couple of different types, but most are corset style, where you put the tube part of the breast shield through a hole at your nipple, and then zip up the bra. Then you attach the rest of the pump parts to the flange and pump hands-free. Easy!
How to single pump with the Medela Freestyle
Sometimes you only want to pump on one side – maybe you’re trying to clear a clogged duct or you’re working on your slacker boob. But if you just plug the tubing into one bottle and leave the other side hanging, you won’t get any real suction.
So all you need to do is plug the tubing that would go into the second bottle into the tubing holder as shown above, and you’ll be back in business.
Do you like your Medela Freestyle? Share any additional tips for how to use the Medela Freestyle that you have in the comments!


Comments & Chitchat
Hi. Whenver I’m pumping at my right breast, milk always gets in the tubing. I don’t know what’s wrong and it happened to me 4x times.
Hi Jen – this can definitely happen with the Freestyle. You could try replacing your pump parts and tubing? But in the meantime, I would just wash the tubing when milk gets in it. Good luck!
Hello
I’ve just replaced the valves and today I felt the suction was less. I saw milk between the valves and the back plate. Should milk have leaked into that part? I think as milk has gone into that area, the suction was reduced? I’m not sure and don’t know what to do. I have been enjoying pumping so long and to experience this now is just distressing
Hi Adi! That is not uncommon. I would try washing and drying them and then see if the suction is better. Good luck!
Hi, so very glad I found your site, so much helpful info. I have this pump and have been using it for 4 mos for exclusive pumping. It’s been great, however, this week it stopped draining my breasts as well. I have all new parts, they are bone dry (learn that lesson early on), everything is connected properly yet suddenly it’s not draining. I’m massaging, using wet heat, and hand expression when possible. It’s not a clogged duct, have had those before. Do you have any advice on any other factors that could be going wrong?
Hi Tricia! Is it on both sides that it’s not draining or just one? Have you tried setting it up as a single pump and seeing if that works (sometimes this helped me pinpoint a problem with one set of pump parts – so try it on both sides)? If that doesn’t work, I can’t think of anything else that could cause it. Does the suction still feel about as strong?
I was on the verge of giving up my pumping journey when I only used my PISA. I hated it and was super painful for me. I mean I had milk blebs like crazy with it and the Vasospasms were horrible. So I started doing research and saw a lot of good things said about the Freestyle. I then started looking for one second hand, because I could not justify spending another $300+ dollars on a pump, and found someone selling hers on Craigslist (there are also many second hand ones on eBay). From my first use of it I knew I could continue. First, it emptied me completely; Second, I no longer dreaded waking up for my MOTN pump (or even my pumping in general); and Third, and probably my favorite feature, is that the vibration doesn’t hurt like it did with my PISA. If I had known that I would have to pump full time I would have done more research before I started, but because I hated my PISA so much I would avoid, or shorten pumps and I’m pretty sure that’s why my supply is not as strong as it could be. I’ll use this one until I’m done feeding my LO. If I get pregnant again I’ll talk my hubs into letting me get a brand new one 🙂
Hi! Is it possible to use other Medela connectors/valves with the Freestyle?? The replacement valves/connectors/back caps are so expensive compared to the other Medela connectors (I.e. like the pump in style ones).
Thanks!
Unfortunately, no. 🙁 They are a lot more expensive! Did you get your freestyle through insurance? You could maybe see if your insurance covers replacement parts.
Ah, bummer. I actually got the freestyle from a friend, so in all honesty paying for the replacement parts is not as hard to swallow. Thanks for your reply!!!