Are you brand new to using a breast pump? Here’s everything you need to know about how to use a Medela Pump in Style Advanced – how to assemble it, how to clean it, and tips for using it!

This post may contain affiliate links, which means if you click a link and purchase something, I may make a small commission at no additional cost to you. I only recommend products I love! More information here.
The Medela Pump in Style is one of the most commonly used breast pumps in the US today. I’ve used it while pumping at work for two babies, and while I think it’s a great pump, it does have a bit of a learning curve. Here’s everything you need to know about how to use it.
If you don’t have your Pump in Style yet, you may be able to get it free through insurance super easily here, or you can buy it from amazon.
(Note: There are now two versions of the Pump in Style. This post is specific to the Pump in Style Advanced – more on the differences between the Advanced and Max Flow here.)
What are each of the breast pump parts, what do they do, and how do you put them together?

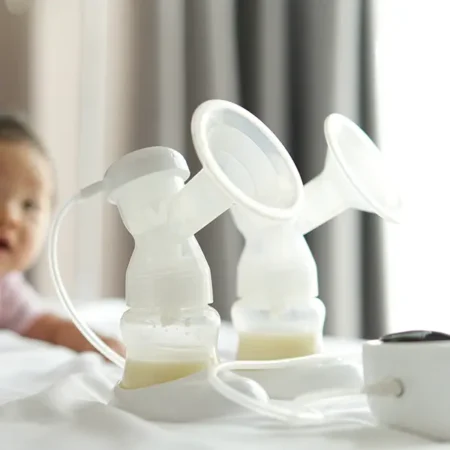
The Medela Pump in Style breast pump parts consist of:
- Flanges – Flanges are also called breast shields (or “horns”) and are the part that fits on your breast. Note that flanges come in different sizes, and the size that comes standard with the Pump in Style (24mm) might not be the correct size for you. More on breast shield sizing here.
- Connectors – This piece connects together the tubing, flanges, and valve membrane.
- Valve Membranes – The valve membrane stretches and releases each time the pump motor pulls at the valve, creating the suction necessary to remove breast milk from your breasts.
- Tubing – The tubing connects the pump motor to your breast pump parts.
- Bottles – Your breast milk will flow into the bottle as you pump.
To put the pieces together, connect each piece – the flange, the valve membrane, and the tubing – to the connector as shown in the photo above. Then screw in the bottle at the bottom of the connector.
How do you use the Medela Pump in Style?

On the breast pump faceplate, you’ll see the following:
- On/Off and Suction Dial – Turning this knob turns the pump on and allows you to adjust the suction level up or down.
- Mode Button – Like most breast pumps, the Medela Pump in Style has two modes: letdown mode and expression mode. In letdown mode, the suction is fast and light; in expression mode, it’s slower and deeper. This button allows you to toggle between the two modes. The Pump in Style starts in letdown mode and automatically switches to expression mode after 2 minutes. You can use this button to switch it sooner if you’d like, or switch it back if you haven’t let down yet when it moves into expression mode.
- Power Adapter Port – Plug your power cord or battery pack in here.
- Tubing Ports – This is where you attach the tubing from your pump parts to the pump itself.
- Tubing Port Cover – If you only want to pump on one side instead of on both, you can cover the other port with the port cover.
To pump with the Medela Pump in Style:
- Plug the pump in
- Attach the tubing to the pump
- Put your pump parts together as described above
- Place the breast shields on your breasts
- Turn the pump on
- After the pump switches to expression mode, turn the suction dial to the highest suction that is comfortable for you. (Keep going until you feel a bit of discomfort, and then dial it back one notch.)
Not sure how long to pump? I would start with about 15 minutes, but it depends a few variables such as on how old your baby is, whether you’re also nursing or just pumping, etc.
Generally, in the beginning, you pump more frequently for a shorter period of time. Later, you might drop pumping sessions but pump for longer. (Here are the pumping schedules I used when I exclusively pumped for my son.)
How do you take care of/maintain the Pump in Style?
Here’s how to clean and maintain your pump.
How to Clean Your Pump Parts and Breast Pump
To wash your pump parts, disassemble them and fill up a clean wash basin with warm soapy water. Wash them thoroughly and rinse, then put them on a clean towel or bottle rack to air dry.
To wash the tubing, wash in warm soapy water and hang to air dry.
Wipe off the faceplate of your pump as needed.
How Often to Replace Your Pump Parts
Pump parts stop working as well over time – they can get stretched out, get microscopic tears, and residue can build up. You should replace pump parts at the following intervals:
- Breast shields and connectors – Every 6 months.
- Yellow valve and white membrane – If you pump 3 or more times per day, every 2-4 weeks. If you pump less than 3 times a day, every 2 months.
- Tubing – When it starts slipping out (even if you aren’t moving around).
You can get a full set of replacement parts on amazon.
What if your Pump in Style stops working?
First, troubleshoot a little bit:
- Try taking your pump parts apart and put them back together.
- Are you pump parts wet? Try a dry set; sometimes wet parts don’t quite work as well.
- Make sure your tubing is securely attached on both sides – if it isn’t, the suction won’t be as strong.
- Try replacing your pump parts.
- Is your power source securely connected?
If none of these are the issue, call Medela customer service. They will help you troubleshoot further and may send you a new pump if necessary.
Extra tips for using the Medela Pump in Style
Here are some additional tips for making using the Pump in Style easier!
Set a timer on your phone
It’s super easy (for me, at least) to overestimate the amount of time that you’ve spent pumping.
When you start pumping, set a timer on your phone to make sure you pump for the full amount of time that you plan to.
Figure out portable power sources
Since the Medela Pump in Style doesn’t have a rechargeable battery, you may want to get a separate battery pack so that you can pump without an outlet if necessary.
Some options include:

To use this battery pack, you just put 8 AA batteries in it. Then, when you need it, you just plug it in the same way you would plug in your normal power cord.

You can also use a car adapter if you’ll be pumping in your car.
Pump hands-free
Holding your breast shields up to your breasts the entire time you pump is annoying, especially if you pump multiple times a day. To avoid this, you can do a few things – get a hands-free pumping bra, or use Freemie cups with your Medela Pump in Style (tips on using Freemies here).
Hands-Free Pumping Bras

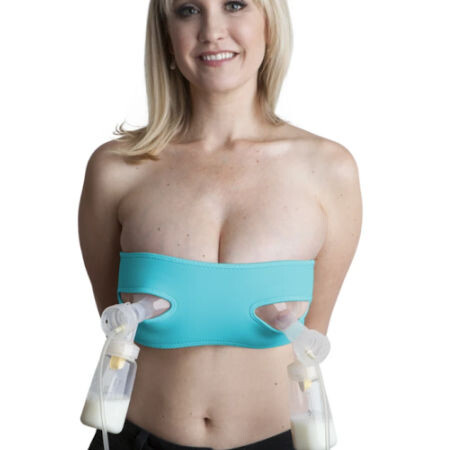

With a hands-free bra, all you do is put the tube part of the breast shield inside the holes of the bra, zip up the bra, and then attach your pump parts as you normally would. The hands-free bra then holds the breast shields in place for you. It’s a lifesaver!

You can also use Freemie cups. These cups go inside your bra (you can use any nursing bra), and collect the milk inside them. This means you don’t have bottles hanging off of your chest, which can make it easier to get other stuff done.
That’s everything you need to know about how to use a Medela Pump in Style! Do you have any questions that I didn’t answer? Leave them in the comments below!


Comments & Chitchat
I have a question about this pump, when using it, is it supposed to sit on its side with the face plate on its side, or is the face plate supposed to be on top?
I am pregnant with my second and used this pump with my first for about a year. For the first six months I pumped multiple times a day and then the last six months, not quite as often. Is the pump still efficient enough to use this time around? Given it is an open system is there concern milk got in the motor at one point (my first is 5 years old) and is no longer hygienic?
Hi Alison! If you can get another (especially if you qualify for a free one with your health insurance), I would. The pump wouldn’t be under warranty anymore and it might be hard to find replacement parts for the pump now that Medela has stopped making new ones. Congrats!
I frequently use this pump once-twice a day. I’ve noticed that my tubing gets condensation inside is that normal? How can I safely clean and sanitize without having mildew build up inside the tubing?
That is normal. HEre’s how to clean it!
https://exclusivepumping.com/cleaning-breast-pump-tubing/
Another option may be to qualify at your local WIC department through Health & Human Services. If you qualify, you get rented breast pumps. They also will have resources and breastfeedjng consultants.
Hello how should I store the machine and tubing I typically leave the tubing plugged in unless condensation or milk gets into it but it stretches out the tubing making the tube stretch out after only a day or so. Should I unplug the tubes before storing?
Thank you
Hi! I didn’t have to do this but it might not be a bad idea. Have you replaced the tubing at all?
Our daughter and daughter in law are both pregnant. Our daughter does not have insurance and is having twin girls in July. Our daughter in law due in April, has insurance but they only give manual breast pumps. How can they both get a medela breast pump.
[email protected]
Hi there! If they don’t qualify, they’d have to pay out of pocket. Amazon might be the cheapest option. I hope this helps! You could also see if you could get a gently used closed system pump (like a Spectra) secondhand through FB or Craigslist?